Part 1: Deploying a Local Kubernetes Cluster
This tutorial will assume that nmaas is installed in a virtual machine that is completely isolated from any production environment. However, the discussed steps are applicable to bare-metal hardware as well, once the correct network strategy has been identified by the system administrator.
Virtual Machine Prerequisites
- Ubuntu >= 20.04 Server or any Desktop flavor
- 12GB+ RAM
- 2+ VCPUs
- 60GB+ storage space
Virtual Machine Setup
Although we will focus on VirtualBox, any virtualization software can be used, depending on the user's preference. Virtualbox 6 is an open-source virtualization software which can be downloaded for free from the official website.
After installation, additional network configuration needs to be done before a Kubernetes cluster can be set up. The following network configuration creates a completely isolated network environment from the production network. nmaas will only be accessible from the host operating system where the virtual machine is deployed.
Our virtual machine will need three network interfaces in total:
- 3 NAT type network adapters (from the same NAT network) which are created manually in Virtualbox (one for Kubernetes, two for freeRTR)
- Optional: 1 Host-only type network adapter which is also created manually in Virtualbox - for accessing the NAT network from the host system. Using this approach, the nmaas instance deployed inside the virtual machine will be made accessible by adding a custom route on the host operating system towards the NAT network, traversing the host-only interfaces.
DHCP should not be enabled for the second or third NAT interfaces, but DHCP should be enabled for the first NAT interface. If an optional host interface has been added, DHCP should be enabled on it as well.
Detailed description of the required configuration steps is given below.
Creating a New NAT Network in Virtualbox
-
Navigate to
File -> Preferences -> Networkand click the Plus button on the right hand side.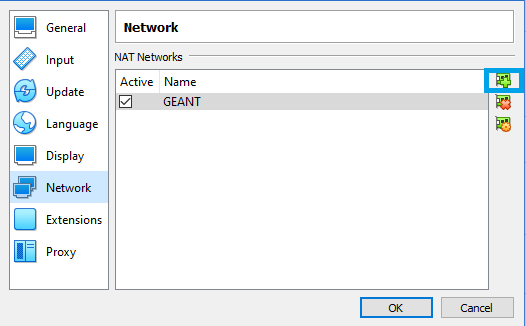
-
Once added, click on the cog icon to configure the newly created network. Alter the network name as desired, and enter a preferred CIDR. Make sure that the
Supports DHCPoption is checked.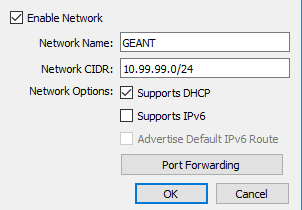
-
If the pre-prepared nmaas VirtualBox image is used, make sure to select the exact same Network CIDR (10.99.99.0/24) since all nmaas components have already been installed and expect addresses in the 10.99.99.0/24 range.
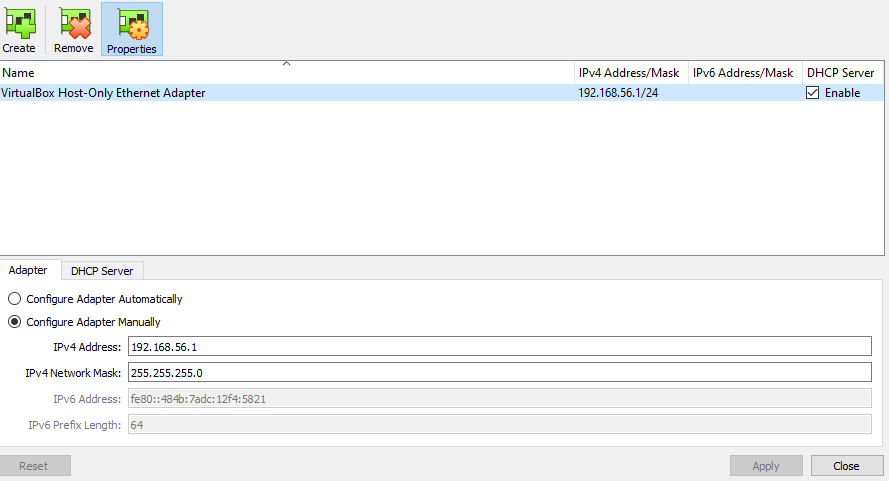
Optional: Creating a New Host-Only Network in Virtualbox
If the nmaas installation needs to be accessible from other networks, one option is to add a Host-Only interface to the virtual machine that will act as a transit between the outside networks and the internal VirtualBox NAT network configured in the previous step.
-
Navigate to
File -> Host Network Managerand click on the greenCreateButton.
-
Select the Configure Adapter Manually radio button and enter the IP address that will be allocated to the host interface connected to the hypervisor along with an appropriate network mask. Make sure that the selected range does not overlap with any existing network or the previously created NAT network.
Creating the Virtual Machine in VirtualBox
Create a regular virtual machine in VirtualBox, using the latest Ubuntu 20.04 ISO. The following parameters need to be altered:
- Allocate sufficient memory to the virtual machine. 12GB is the minimum amount which will support a complete nmaas installation, along with the possibility for deploying additional applications via the catalog.
- Allocate sufficient number of CPU cores, depending on the performance of your system.
- In the
Networkconfiguration tab, add three adapters:- Adapter 1: NAT Network (Select the network created previously)
- Adapter 2: NAT Network (Select the network created previously)
- Adapter 3: NAT Network (Select the network created previously)
- Optional: Adapter 4: Host-only Adapter (Select the network created previously)
- If a Desktop version of Ubuntu is being installed, make sure to enable 3D acceleration in the
Displaytab.
Configuring the Guest Operating System
Once the guest operating system has been installed, DHCP should be manually disabled on the second and third NAT interfaces. In case of an Ubuntu Server installation, this can be done by editing the Netplan configuration, located in /etc/netplan/00-installer-config.yaml:
| /etc/netplan/00-installer-config.yaml | |
|---|---|
Make sure to execute sudo netplan apply so that the new changes will take effect.
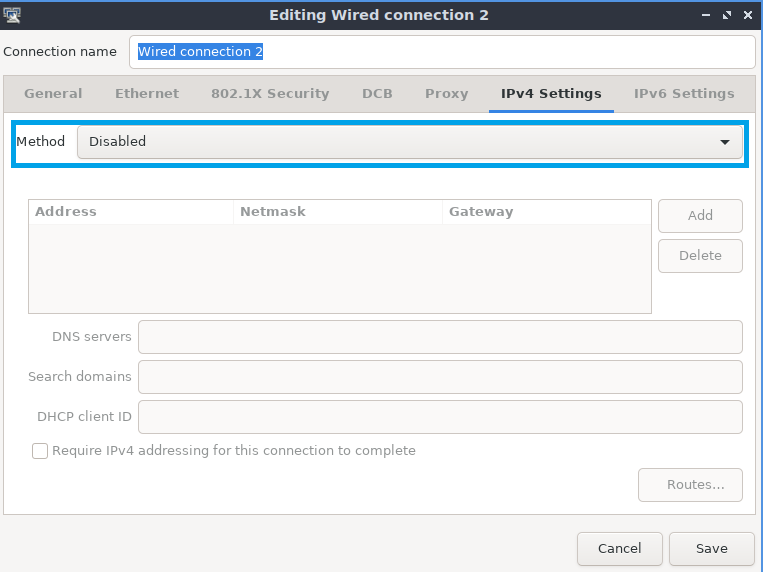
Desktop editions of Ubuntu usually come with their own GUI network manager, so the interface status should be set to Disabled:
Optional: In case a host-only interface has been added to the virtual machine, create a route on your host operating system towards the NAT network via the host-only network interface. Examples are given below both for Microsoft Windows and GNU/Linux host operating systems below.
| Microsoft Windows | |
|---|---|
| GNU/Linux | |
|---|---|
Kubernetes Cluster Setup
In this section we discuss two quick methods of setting up a local Kubernetes cluster.
Option 1: MicroK8s Installation
MicroK8s is a snap-based application that can setup a fully functional Kubernetes cluster by executing a single command. It also supports many popular addons which can also be enabled very easily.
MicroK8s abstracts away many Kubernetes configuration steps, especially when using the addon system. This can be seen as either an advantage or a disadvantage.
-
Install the MicroK8s snap, using the 1.20 version:
-
Add the current user to the
microk8sgroup so that access to themicrok8scommand is unrestricted: -
Wait until everything is ready:
-
Manually check the node status and the list of running pods:
Addons Setup
CNI
Calico comes installed by default, no further manual configuration is required.
DNS
To enable CoreDNS the following command should be executed:
By default the Google DNS servers will be used as upstreams (8.8.8.8 and 8.8.4.4). If there is a local DNS server available that should be used instead, it can be specified using semicolons:
Once the command is executed, all of the necessary Kubernetes resources are immediately created and the associated pods brought up:
Testing DNS Resolution
Testing the DNS resolution is an optional, but recommended step to ensure that the deployed CoreDNS instance is functioning properly. To do so, an instance of dnsutils can be deployed:
Once the Pod enters a ready state, we can open a shell session:
Storage
A local path provisioner can be enabled using:
Beware when using this in clusters with more than one node.
MetalLB
MetalLB is a Kubernetes LoadBalancer implementation.
Pick a free range from the local address space for easiest access during testing.
Ingress Nginx
Ingress Nginx is a popular Ingress controller for Kubernetes, based on the widely used Nginx web server.
To make the newly deployed ingress accessible from outside the CNI network, a LoadBalancer Service can be created with an address assigned by MetalLB:
| ingress-lb.yaml | |
|---|---|
Once the assigned IP to the LoadBalancer Service has been acquired by executing the previous command, a browser window can be opened on the local workstation so as to perform a test access to the Ingress Controller. A generic 404 not found message should be displayed.
Helm
Helm is a package manager for Kubernetes allowing seamless installation of complex application. nmaas and all of its dependencies have also been packaged as Helm charts, thus easing their deployment process.
Similarly to the way that the kubectl client is accessed, Helm can be invoked using:
Helm Version
Unfortunately, the Helm version installed in this manner, as an official MicroK8s addon is too old. A newer version, if needed, can be installed by following the instructions available below. Please note that the GitLab chart, which is a dependency of nmaas requires a newer Helm version than the one installed as a MicroK8s addon.
Installing a Newer Helm Version
- Download the latest Helm release from https://github.com/helm/helm/releases for your architecture (e.g. https://get.helm.sh/helm-v3.7.0-linux-amd64.tar.gz).
-
Unpack the downloaded archive file and move it to a location in
PATH. -
Finally, the kube config to interact with the MicroK8s Kubernetes cluster needs to be copied to the appropriate location:
Option 2: K3s Installation
K3s is another easy way to configure a full-fledged Kubernetes cluster in a matter of minutes. K3s is more lightweight than other Kubernetes distributions since it does not ship with unnecessary modules, such as the ones for integrating with various cloud providers. K3s offers seamless scalability across multiple nodes and provides the ability to either use an embedded database for storing the cluster state or a relational one, such as PostgreSQL or MySQL.
-
K3s can be installed with the following command:
--tls-san– can be specified multiple times to add additional names for which the automatically generated Kubernetes API certificates will be valid. Make sure to replace the IP address with the IP address of your VM.--disable=traefik– Traefik needs to be explicitly disabled since it ships by default with new K3s installations. We will use ingress-nginx as our ingress controller and will install it manually in a later step.--flannel-backend=none– Flannel CNI needs to be explicitly disabled, since we will manually install Calico.--disable-network-policy– we do not need the default network policy addon that enabled the use of Kubernetes NetworkPolicy objects, since Calico has built-in support for network policies.--disable=servicelb– the preconfigured implementation for LoadBalancer service objects should be disabled, since we will manually install MetalLB.--write-kubeconfig-mode 664– more permissive permissions are needed for the automatically generated kubeconfig file so that regular users, apart from root, can use the kubectl client as well.--clister-cidr=10.136.0.0/16– a free subnet range which will be used as the pod network. Should be written down since it will be required in the Calico deployment as well.
-
Another way of providing
kubectlaccess to different users is to make a copy of the original kubeconfig file located in/etc/rancher/k3s/k3s.yamlinto a directory and changing its permissions. Then, by exporting theKUBECONFIGenvironment variable, the kubectl client will be forced to use the newly created configuration: -
Our cluster is still not in a Ready state, since we do not have a CNI plugin installed yet.
Addons Setup
CNI
-
Calico can be manually installed by downloading the manifest file and setting the CALICO_IPV4POOL_CIDR parameter to the value set when deploying K3s.
-
Once Calico has been installed, the node should transition to a
Readystate.
DNS
CoreDNS is installed by default with K3s, so no need for any manual installation or configuration. Once Calico CNI has been deployed and the cluster has entered a Ready state, DNS resolution can be tested using the dnsutil pod, as described in the official Kubernetes documentation page.
Once the Pod enters a ready state, we can open a shell session:
Storage
An instance of local path provisioner is automatically installed when deploying K3s, which is sufficient for development single-node clusters such as ours.
MetalLB
MetalLB can be installed using the official Kubernetes manifests.
-
To install MetalLB, first the
metallb-systemnamespace must be created: -
Once the namespace has been created, it can be populated with all of the other necessary components:
-
Finally, a default configuration ConfigMap should be created, describing the address range allocated to MetalLB. Please make sure to select an unused block of space. In our case, we will use addresses
10.99.99.150to10.99.99.200from the GEANT NAT network which we configured in VirtualBox at the start of the guide.metallb-config.yaml
Helm
To install Helm, we need to first download the latest binary for our architecture and extract it to a location which is in the PATH system variable.
- Visit https://github.com/helm/helm/releases and copy the download link for the latest release.
-
Download the latest release locally
-
Test whether Helm has been successfully installed by executing
helm version.
Ingress Nginx
The last application that needs to be installed before we can move on to installing the nmaas components is Ingress Nginx. Since we have already configured Helm, the Ingress Nginx installation is simple.
-
Customize the values.yaml file according to the local environment:
In our case we have opted to use a Deployment instead of a DaemonSet for the deployment strategy. Additionally, we have selected a service type of LoadBalancer since we have already installed MetalLB and it is ready to allocate an IP address to our LoadBalancer service.
-
Add the
ingress-nginxHelm repository and install the application:We have chosen to install
ingress-nginxin thenmaas-systemnamespace, which will house all the other nmaas components as well.Note About Helm Errors
When running the helm install command, Helm might throw an error about the cluster being unreachable. This is most likely because Helm looks for the kube.config file in the default location, but
--write-kubeconfig-mode 664has been specified during the K3s installation, and the actual location is/etc/rancher/k3s/k3s.yaml.This can be fixed by simply executing:
-
We can test the installed ingress by directly visiting the allocated LoadBalancer IP address in a browser. We should be presented with a generic
404-not foundpage.